Installation will be done using UPI (User Provisioned Infrastrcuture) approach for SNO (Single Node OKD)
Pre-Requisite Steps
Make sure previous steps is done. If not please refer to the previous article:
- preparing OKD installation program using openshift-install
- Creating master ignition file for OKD SNO
at this rate, a master.ign and install-config.yaml should be ready.
Droplet Provisioning

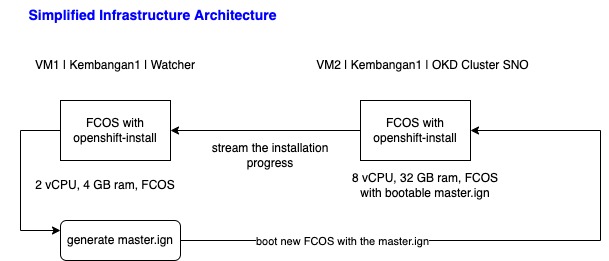
there will be two droplet (VM) used for the cluster installation
- 1) Watcher VM. basically droplet to execute the openshift-install. This VM will be used to monitor the install progress at the OKD server.
- 2) OKD Cluster Server. a VM that will be used to deploy the OKD cluster
Watch VM will connect to the OKD Cluster service using public domain name and monitor the installation status/progress. Each of the VM should have different specs
Watcher VM Specs
watcher doesnt require big resources. As long as it can execute openshift-install for creating manifest and ignition from install-config.yaml its enough.
Below are the suggested specs
- OS : Fedora Core OS (FCOS)
- RAM : 2 Gigs
-
CPU : 2 vCPU
Ensure that the VM specs has openshift-install binary installed on the $PATH. Otherwise, watching the installation progress of OKD cluster would be impossible.
OKD Cluster VM Specs
Dont provision the second droplet/VM before the watcher VM already in places!. Because the droplet spinoff for the cluster will require the master ignition to be attached.
this is where the OKD cluster will be installed using SNO (Single node OKD) mode. Hence, it require a vertically scaled VM.
Below are the suggested specs
- OS : Fedora Core OS (FCOS) with pre-attached master ignition
- RAM : 32 Gigs
- CPU : 8 vCPU
Watcher VM (a recap)
Component needed
openshift-install and openshift client are installed. Openshift install is used to generate manifest and master ignition while openshift client will be used for monitoring. it has “oc” and “kubectl” tools for watching progress/monitoring progress.
Download binary
Openshift install
curl -L -o openshift-install-linux-4.15.0-0.okd-2024-03-10-010116.tar.gz https://github.com/okd-project/okd/releases/download/4.15.0-0.okd-2024-03-10-010116/openshift-install-linux-4.15.0-0.okd-2024-03-10-010116.tar.gz
Openshift Client
curl -L -o openshift-client-linux-4.15.0-0.okd-2024-03-10-010116.tar.gz https://github.com/okd-project/okd/releases/download/4.15.0-0.okd-2024-03-10-010116/openshift-client-linux-4.15.0-0.okd-2024-03-10-010116.tar.gz
Move openshift-install, oc and kubectl to $PATH and extract it
sudo mv openshift-client-linux-4.15.0-0.okd-2024-03-10-010116.tar.gz /usr/local/bin
sudo mv openshift-install-linux-4.15.0-0.okd-2024-03-10-010116.tar.gz /usr/local/bin
Extract
sudo tar -xvf openshift-client-linux-4.15.0-0.okd-2024-03-10-010116.tar.gz
sudo tar -xvf openshift-install-linux-4.15.0-0.okd-2024-03-10-010116.tar.gz
Validation
execute openshift-install, oc and kubectl from any directories. If no error meaning all those three component has been successfully installed.
Creating FNOS ISO for OKD Single Node OKD (SNO)
Create Fedora Droplet or VM
provision either fedora or ubuntu or basically any linux that can support coreos-installer package. The VM will be used purely to create an ISO / image for OKD SNO.
Digitalocean doesnt support ISO format, it need to be converted into cloud VM format at the end of the steps.
Set OKD Version
version used on this article is :
4.15.0-0.okd-2024-03-10-010116
set host variable
export OKD_VERSION=4.15.0-0.okd-2024-03-10-010116
Set target architecture
architecture used on this article is :
x86_64
set architecture variable
export ARCH=x86_64
Download and Install OKD Client
can get the download url from below path
$ curl -L https://github.com/okd-project/okd/releases/download/$OKD_VERSION/openshift-client-linux-$OKD_VERSION.tar.gz -o oc.tar.gz
or simply refer to following section : Component Needed
Generate FCOS ISO for OKD SNO

openshift has the information about FCOS ISO. below command will printed out the ISO URL.
export ISO_URL=$(openshift-install coreos print-stream-json | grep location | grep $ARCH | grep iso | cut -d\" -f4)
download the ISO
curl -L $ISO_URL -o fcos-live.iso
Determine machine network
get subnet assigned on Digital ocean droplet
ip a | grep ens3
look for tne ens3 to determine the private network subnet.
2: ens3: <BROADCAST,MULTICAST,UP,LOWER_UP> mtu 1500 qdisc fq_codel state UP group default qlen 1000
    link/ether 82:8c:ed:88:ce:d8 brd ff:ff:ff:ff:ff:ff
    altname enp0s3
    inet 159.223.64.209/20 brd 159.223.79.255 scope global noprefixroute ens3
       valid_lft forever preferred_lft forever
    inet 10.15.0.5/16 brd 10.15.255.255 scope global noprefixroute ens3
       valid_lft forever preferred_lft forever
    inet6 fe80::808c:edff:fe88:ced8/64 scope link noprefixroute
       valid_lft forever preferred_lft forever
Convert ISO to qcow2
qemu-img convert -f raw -O qcow2 fcos-live.iso fcos-image.qcow2
Exposing Live OS file to public http (for DO Custom Image)
http need bo exposed to that the OKD server can access the bootstrap ignition files.
install python3 on toolbox(basically an development container) because FCOS doesnt come with python3 by default.
sudo dnf install -y python3
move to the folder that actually has bootstrap ignition
cd /var/home/core/meruyacluster
python3 -m http.server 8080
or run in background:
nohup python3 -m http.server 8080 > http.log 2>&1 &
install-config.yaml
apiVersion: v1
baseDomain: milestoneku.com
compute:
- name: worker
  replicas: 0
  hyperthreading: Enabled
controlPlane:
  name: master
  replicas: 1
  hyperthreading: Enabled
metadata:
  name: sno-cluster
networking:
  clusterNetwork:
  - cidr: 10.132.0.0/14
    hostPrefix: 23
  machineNetwork:
  - cidr: 10.130.0.0/16
  networkType: OVNKubernetes
  serviceNetwork:
  - 172.30.0.0/16
platform:
  none: {}
bootstrapInPlace:
  installationDisk: /dev/disk/by-id/scsi-0DO_Volume_okd-volume
pullSecret: 'your auth'
sshKey: |
  ssh-rsa AAAAB...
Generating ignition file
go to folder where the install-config.yaml present and use openshift-install to generate the OKD installation assets (including the bootstrap ignition for SNO setup)
$ ./openshift-install --dir=. create single-node-ignition-config
creating FCOS Iso with embedded
note: on this article, fedora is used as the host VM (temporary VM for installation)
execute below command to install coreos-installer on fedora pod
$ alias coreos-installer='podman run --privileged --pull always --rm \
    -v /dev:/dev -v /run/udev:/run/udev -v $PWD:/data \
    -w /data quay.io/coreos/coreos-installer:release'
embed the ISO with bootstrap ignition
$ coreos-installer iso ignition embed -fi bootstrap-in-place-for-live-iso.ign fcos-live.iso
Create SNO Droplet
minimum is 16 gigs of ram and 8 CPU
once the droplet is created, execute following checklist before executing the openshift-install to actually install the cluster
1. ensure the domain name is configured
- api.<cluster_name>.<base_domain>
- api-int.<cluster_name>.<base_domain>
- *.apps.<cluster_name>.<base_domain>
on this cases is :
milestoneku.com -> point to the droplet ip (A Name DNS)
api.sno-cluster.milestoneku.com -> point to the droplet ip (A Name DNS)
api-int.sno-cluster.milestoneku.com -> point to the droplet ip (A Name DNS)
*.apps.sno-cluster.milestoneku.com -> point to the droplet ip (A Name DNS)
2. DNS Check
make sure those 4 domain can be accessed. Use ns command to check it.
nslookup milestoneku.com
nslookup api.sno-cluster.milestoneku.com
nslookup api-int.sno-cluster.milestoneku.com
nslookup any.apps.sno-cluster.milestoneku.com
3. wait until the boostraping process on OKD VM is completed
Monitoring openshift cluster Installation
on the host VM (after completing above checklist), install the openshift.
openshift-install --dir=. wait-for install-complete
monitor the logs that displayed on the console
Check openshift status on the OKD server
these two command will be able to tell what happened on the openshift.
journalctl -b -f -u release-image.service -u bootkube.service
or
sudo journalctl -u bootkube.service --no-pager
Check openshift status on Host server (temporary VM)
check whether the openshift nodes has been up
oc node
